Requirements:
Active ShipWise account on https://app.shipwise.com/
Approved Users
Must have the approved amount of user/workstations for installation.
Windows Operating system
Windows 10, and Windows 11 versions supported
Step By Step
Step 1:
Determine the latest version of On-premises by updating a local copy. Make a note of the version number.
Step 2:
Download the On-premises installer using the following link:
https://s3-us-west-2.amazonaws.com/dsx-installer/Windows/Dev/1.1.0.541/install.msi
Paste the link into a browser. Run the file download. The installer file will be in the user's Downloads folder
SECURITY NOTE: Depending on the browser security settings, the install.msi file may not be "trusted".
You may need to indicate that the file is safe for download. Follow the browser specific prompts to keep the downloaded file and mark it as safe.
-Apr-28-2026-07-06-38-9833-PM.png?width=558&height=314&name=DSX%20Install%20(1)-Apr-28-2026-07-06-38-9833-PM.png)
Step 3:
Run the install.msi On-premises installer. You will see a Windows warning box, click More info, then Run anyway to start the installer.
-4.png?width=670&height=377&name=DSX%20Install%20(2)-4.png)
Continue through the installation steps. Determine whether you want On-prem installed for all users on the PC (recommended) or just the currently signed in Windows user (uncommon). Click Next to continue.
-4.png?width=670&height=377&name=DSX%20Install%20(4)-4.png)
-4.png?width=670&height=376&name=DSX%20Install%20(3)-4.png)
IMPORTANT:Sign in with an existing ShipWise user and password and proceed to the setup steps # below.
Step 4: Switching endpoint (https://app.shipwise.com/ accounts only)
With the On-premises application closed, navigate to the folder C:\ProgramData\DSX. Open the DSX folder.
NOTE: ProgramData is a hidden folder in Windows by default. You may need to show hidden folders in Windows in order to see this folder.

Older versions of Windows you can access the same settings through Control Panel.
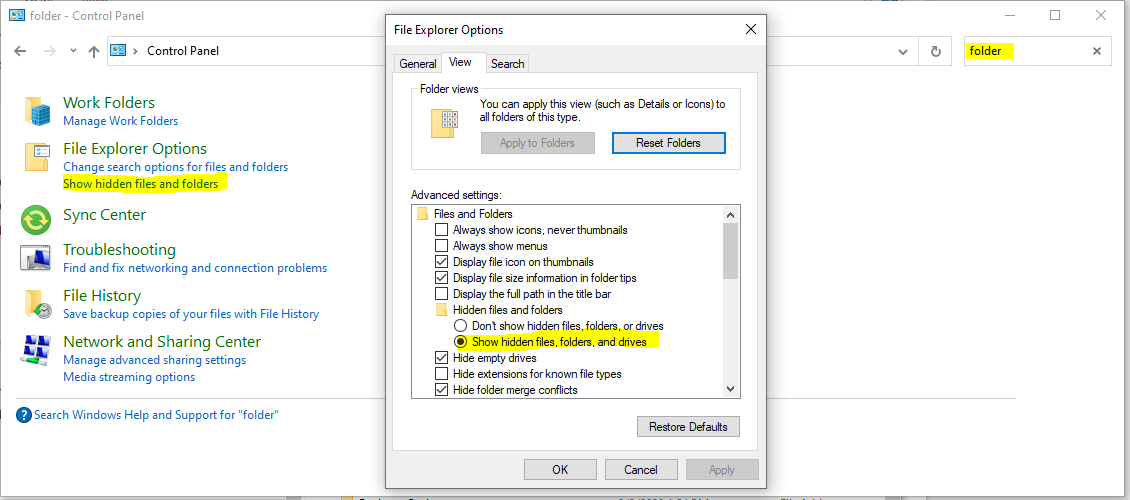
The ProgramData\DSX folder should have only two files at this point.
Delete:
DSXLocal_v001.db and
DSXLocal_v001.db.backup
Restart On-prem from the desktop shortcut. You should see a prompt screen like this:

For an account that is still on https://app.shipwise.com/, select the https://api.shipwise.com/ endpoint. Click Save and accept the User Agreement on the next screen.
Other endpoints shown are only for use upon direction from the Management team.
Sign in at the login screen with an existing ShipWise user and password for the account.

Continue to setup steps below.
Step 5: On-premise Printer setup
-2.png?width=670&height=377&name=Knowledge%20Base%20Images%20(1)-2.png)
Determine which printer language should be used, ZPL or PNG.
- PNG is a image file. This is required if the printer will be using packing slips from DS Cloud.
- ZPL is Zebra Printer Language. It is coded instructions that are sent to the printer's memory. It is slightly faster to process than PNG. The printer must be a Zebra brand printer or have ZPL capability.
-1-2.png?width=560&height=467&name=DSX%20Install%20(1)-1-2.png)
Select the printer language, label printer and report printer from the drop-down menus.
NOTE: Printer drivers must be installed in Windows for the printers to show up.
Select the number of copies (0-3) for customs reports to print.
Select Print Packing Slip (PNG only) if a Cloud packing slip is going to be used.
Click Save and Close.
Step 6: On-prem scale setup
Open the Scale settings window.
-2.png?width=670&height=377&name=Knowledge%20Base%20Images%20(2)-2.png)
On-prem can detect most USB connected scales. If a scale shows in the Window, click Connect, Auto Pull Weight, and Ignore Host Weight, then Read scale to determine if On-prem is reading the same weight as the scale display. If correct, then Save and Close.

If the scale is connected to the PC and is On but does not show in the Scale window, it may need to be manually added.
The following conditions indicate a scale that will need to be manually added.
- An older model USB scale that does not have its hardware IDs registered in On-premises. This scale may show up in Windows Control Panel > Devices and Printers as an Unspecified USB device but is not detected by DSX in the scale window.
- A serial port scale connected to a serial (COM) port on the PC.
- A serial port scale connected with a serial-to-USB converter to a USB port on the PC. This usually shows as an unspecified USB device in Windows Control Panel > Devices and Printers. The serial to USB converter is a separate device and must have its drivers installed.
Step 7: Select Integration
Click the "please select an order manager" to view the available integrations. Only integrations that have been set up on the DS Cloud account will be available. Select the integration appropriate for the test order.
-2.png?width=654&height=368&name=Knowledge%20Base%20Images%20(5)-2.png)
Step 8: Final Settings and Testing
Select Order Lookup
On-premises will attempt to look up an order by Order ID as default. If the inputted value is not the Order ID, you will need to set the alternate lookup type. Navigate to Settings > Order Settings > Order Lookup By and select the correct input value type.
-2.png?width=639&height=360&name=Knowledge%20Base%20Images%20(3)-2.png)
Select AVS to turn on Address Verification
-2.png?width=649&height=365&name=Knowledge%20Base%20Images%20(4)-2.png)
Input the Order ID (or alternate value) in the top left-hand box and click the magnifying glass symbol to begin the order lookup.
Update On-premises
![]()